Embossed Six-pointed Origami Star
A six-pointed star is one of those folds that looks far more impressive than the effort it takes — especially this embossed version, where the center puffs up and the points stand proud. It starts from a regular hexagon (easy to make from a square) and leans on two satisfying moves: the petal-fold and the rabbit-ear-fold. If you've been wanting to level past basic models, this is a great next step. Brew something warm, clear the table, and let's raise a little star.
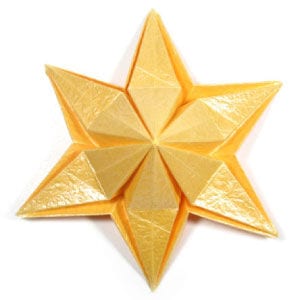
This page is for anyone who wants instructions to fold a six-pointed origami paper star.
This embossed six-pointed origami star starts from a regular hexagon, which you can convert from a square sheet. The special folding techniques used in this model are the petal-fold and the rabbit-ear-fold.
If you're ready, let's get started.
You may use any kind of paper to fold the origami star (*it's a bit easier if the front and back of the paper differ slightly, whether in texture or color).
Make sure your paper is a square (all sides equal, all angles 90°). The sheet I'm using here is a 15cm × 15cm square.
This is the front side of the paper I'm using for this instruction.

This is the back side of the paper. As you can see, the back is less shiny than the front.

There is a separate instruction that shows how to make a regular hexagon from a square. You can easily get a regular hexagon from that. This is the front side of the regular hexagon.

This is the back side of the regular hexagon.

STEP 1.
Start with the back side of the regular hexagon facing up. Prepare to apply the crease pattern (CP) shown on the left.

STEP 2.
Apply the CP from step 1. Prepare to press the origami star model flat by following the arrows.

STEP 3.
Flatten the origami star model by moving your fingers along the arrow directions from step 2. Prepare to rotate the origami star model 90 degrees.

STEP 4.
Rotate the origami star model 90 degrees. Prepare to apply two valley-folds.

STEP 5.
Apply the two valley-folds from step 4. Prepare to unfold the two valley-folds you just made.

STEP 6.
Unfold the two valley-folds from step 5. Prepare to apply two valley-folds.

STEP 7.
Apply the two valley-folds from step 6. Prepare to apply a horizontal valley-fold and then unfold.

STEP 8.
Apply the horizontal valley-fold from step 7 and then unfold. Prepare to unfold the two valley-folds from step 7.

STEP 9.
Unfold the two valley-folds from step 7. Prepare to apply a "petal-fold". Try to learn the petal-fold from the link above.

STEP 10.
Apply the petal-fold from step 9. Prepare to apply two "rabbit ear-folds".

STEP 11.
Apply the two rabbit ear-folds from step 10. Prepare to apply a vertical valley-fold.

STEP 12.
Apply the vertical valley-fold from step 11. Prepare to repeat steps 4–11.

STEP 13.
Repeat steps 4–11. Prepare to turn the origami star model over.

STEP 14.
Turn the origami star model over. Prepare to apply a vertical valley-fold.

STEP 15.
Apply the vertical valley-fold from step 14. Prepare to repeat steps 4–11.

STEP 16.
Repeat steps 4–11. Prepare to open the origami star model.

STEP 17.
Open the origami star model a little. This is the top view. Prepare to push the top with your finger.

STEP 18.
Push the top with your finger until your finger touches the bottom.

STEP 19.
The model will be transformed into the one shown on the left. Prepare to turn the model over.

STEP 20.
Turn the model over. You are almost there.

STEP 21.
Prepare to apply the crease pattern (CP) on the left onto the existing creases. All the creases you need are already there. You only need to emphasize each crease as either a valley-fold or a mountain-fold.

STEP 22.
Apply the CP from step 21. Congratulations! You have completed a six-pointed origami paper star.