
How to Fold an Origami Pine Tree
There's something quietly magical about a tree you can fold from a single square—no pot, no soil, no watering, just paper coaxed into a small, standing pine. It's the kind of fold that feels festive the moment it's done, yet asks for nothing but a few careful creases.
This version is a tidy ten-step classic. You'll start from the familiar base, open and flatten each flap into the tree's green tiers, then nudge everything into balance so it stands by itself. Take your time at the flap-folding stage and the rest almost takes care of itself. Let's fold a little forest.

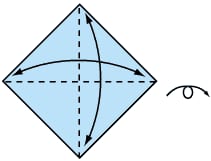
STEP 1. Start With A Square Piece Of Paper, Coloured Side Up.
Fold In Half In 2 Directions.
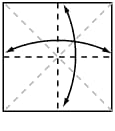
STEP 2. Turn The Paper Over To The White Side.
Fold The Paper In Half, Crease Well And Open, And Then Fold Again In The Other Direction
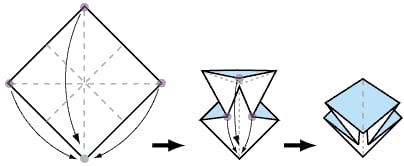
STEP 3. Using The Creases You Have Made, Bring The Top 3 Corners Of The Model Down To The Bottom Corner. Flatten Model



STEP 4. Fold Toward Centre Line And Unfold.
STEP 5. Using The Crease You Have Just Made, Open And Flatten This Flap.
STEP 6. Repeat Step 4 And 5 On The Other 3 Sides, So Your Model Looks Like This.


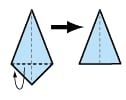
STEP 7. Now Make Sure There Are Equal Flaps Underneath The Model, And That The Top Flap Is Showing Full Color, Like This.
STEP 8. Fold Whole Model Along This Crease And Unfold
STEP 9. Fold Each Full Colour Flap Backwards Underneath Itself.

STEP 10. Now You Can Adjust Your Pine Tree So It Is Even All The Way Around, And It Stands Up By Itself.
And It’s Finished!





