
Tulip
The tulip is one of the simplest — and most satisfying — origami flowers you can make. With a single square of paper and a puff of breath, you'll turn flat folds into a rounded, three-dimensional bloom that stands on its own.
In this tutorial we build the flower from a waterbomb base, tucking flaps together and inflating the body before peeling the petals open. Pair it with a folded stem and you've got a cheerful paper tulip that never wilts — a perfect project for spring, Mother's Day, or a rainy-day craft with the kids.

How to Fold an Origami Tulip
STEP 1: Start with your paper coloured side up. Fold it in half, then in half again as shown. Crease well, then open it back out.


STEP 2: Turn the paper over and fold it in half diagonally in both directions. Crease well and open it out again.
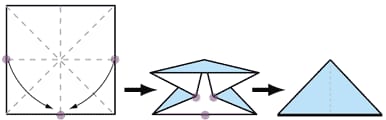
STEP 3: Holding the points shown, bring them both down to the centre point on the bottom line, then flatten the model. This is called a waterbomb base.

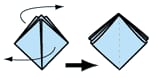
STEP 4: Fold the bottom corners of the front flaps up to the top corner. Repeat on the back as well.
STEP 5: Turn the front flap to the left, like turning the pages of a book. Do the same on the other side of the model.


STEP 6: Move the upper flaps toward each other and tuck one into the other as far as it goes.
STEP 7: As you flatten this, make sure the distances A and B shown are equal.
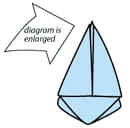


STEP 8: Repeat steps 6 and 7 on the back of the model to get this shape.
STEP 9: Blow into the base of the tulip to inflate and shape the flower.
STEP 10: Peel each petal down slowly and carefully. Your tulip is now finished.
You can pair it with a flower stem, as pictured.





