
New Origami Ninja Star
Some origami models are made to sit quietly on a shelf; this one is made to be thrown. Folded from a single square of paper, the ninja star collapses into a stiff, bladed little disc whose center locks together, and it is the sort of model that tempts you to test it across the room before you have even read the last step.
The secret to the design is the opening phase: you pre-crease the whole sheet into a grid of valley and mountain folds, then snap the paper into shape by pressing down and rotating the center. Along the way you will meet two folds that show up in all sorts of other models - the inside reverse-fold and the squash-fold - so the star doubles as practice for harder projects. Double-sided paper makes it easier to tell the faces apart, and if you really want a throwing star, use a thick, tough sheet.
This page is for everyone who wants to learn how to fold this new origami ninja star.
This new origami ninja star needs only a single square sheet of paper, and it starts from a plain square. The special techniques you will use in this model are the inside reverse-fold and the squash-fold.
Before you begin, make sure you know what valley-folds and mountain-folds are. If you are comfortable with those two basic moves, folding this star will give you no trouble.
If you are ready, let's get started.
You can use almost any kind of paper for this origami star. It helps if the front and back of the sheet look slightly different, whether in texture or in colour, so that the two sides are easy to tell apart.
Make sure your paper is a perfect square, with all four sides equal and every corner exactly 90 degrees. This example uses a double-sided sheet of 15cm x 15cm origami paper. If you want to throw the finished star, choose a thicker and tougher sheet.
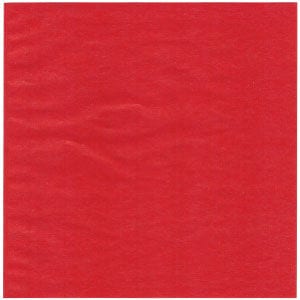
This is the front side of the paper used in this tutorial - a typical sheet of ordinary origami paper.
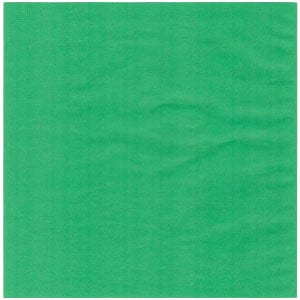
And this is the back side of the same sheet.
STEP 1.
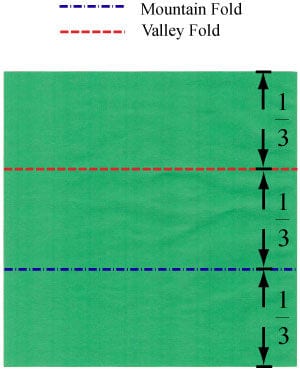
Start with the back side of the paper facing up. Prepare to apply a horizontal "Z-fold", then unfold.
STEP 2.
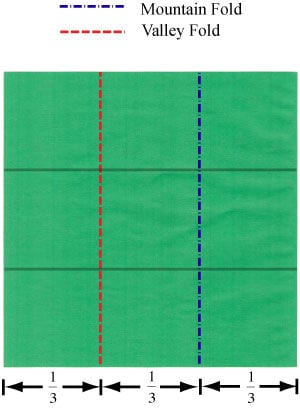
Apply the horizontal "Z-fold" from step 1, then unfold. Prepare to apply a vertical "Z-fold", then unfold.
STEP 3.
Apply the vertical "Z-fold" from step 2, then unfold. Prepare to apply two horizontal "valley-folds" and one horizontal "mountain-fold", then unfold.
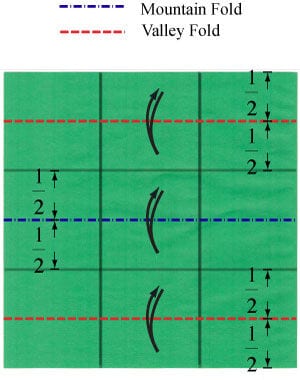
STEP 4.
Apply the two horizontal "valley-folds" and the horizontal "mountain-fold" from step 3, then unfold. Prepare to apply two vertical "valley-folds" and one vertical "mountain-fold", then unfold.
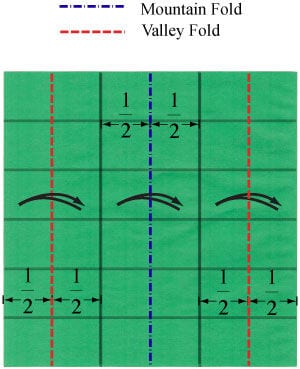
STEP 5.
Apply the two vertical "valley-folds" and the vertical "mountain-fold" from step 4, then unfold. The paper is now fully pre-creased and ready for the next stage.
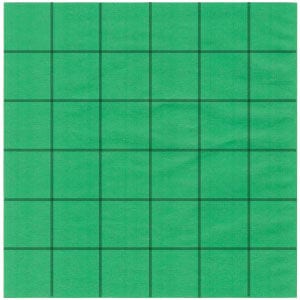
STEP 6.
Prepare to apply eight "mountain-folds" and four "valley-folds".
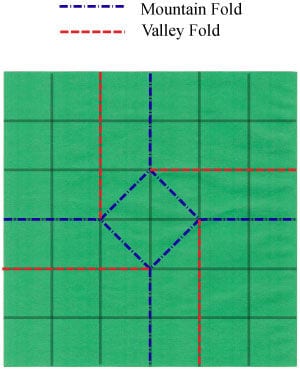
STEP 7.
Apply the eight "mountain-folds" and the four "valley-folds" from step 6. Prepare to grab the two regions marked by dotted circles.
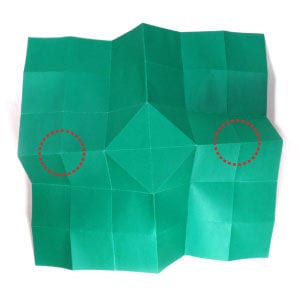
STEP 8.
Grab the two mountain-folded regions. Prepare to rotate the center square counterclockwise while pressing it down slowly.
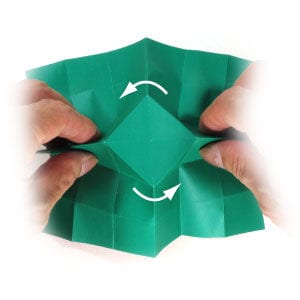
STEP 9.
Start rotating the center square counterclockwise while pressing it down slowly.
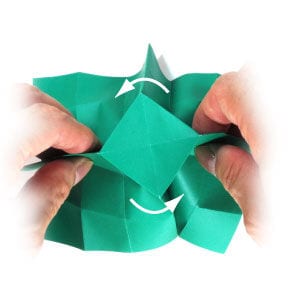
STEP 10.
Continue rotating the center square counterclockwise while pressing it down slowly.
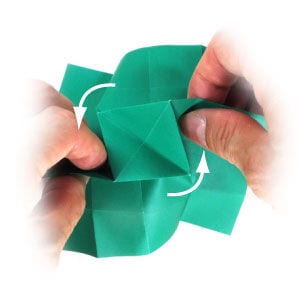
STEP 11.
Keep rotating the center square counterclockwise while pressing it down slowly.
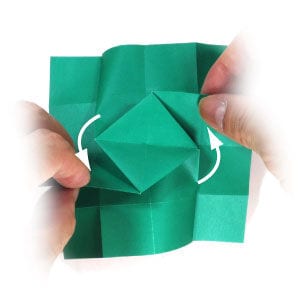
STEP 12.
Finish rotating the center square counterclockwise while pressing it down slowly.
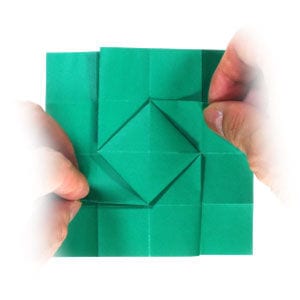
STEP 13.
Prepare to turn the model over.
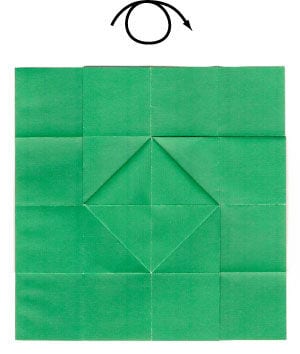
STEP 14.
Turn the model over. Prepare to apply four "valley-folds", then unfold.
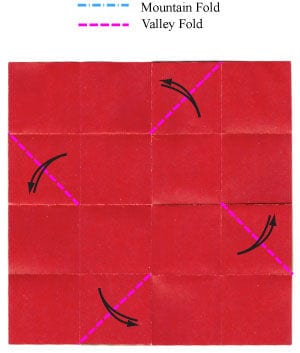
STEP 15.
Apply the four "valley-folds" from step 14, then unfold.
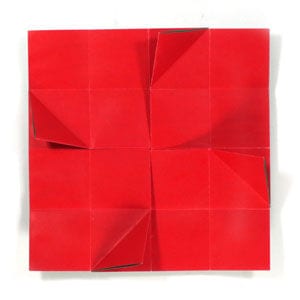
STEP 16.
Prepare to apply four "inside reverse-folds". Work on the top one first.
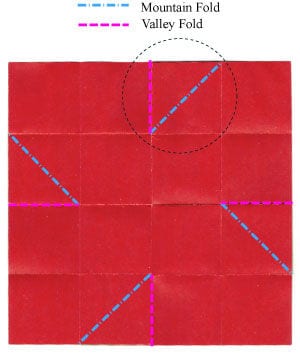
STEP 17.
Start applying a "squash-fold" along the existing crease lines.
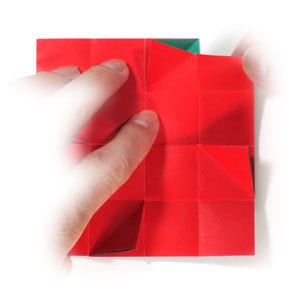
STEP 18.
Continue applying the "squash-fold" along the existing crease lines.
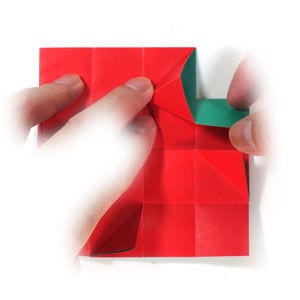
STEP 19.
Finish applying the "squash-fold" along the existing crease lines. Prepare to apply a horizontal "valley-fold".
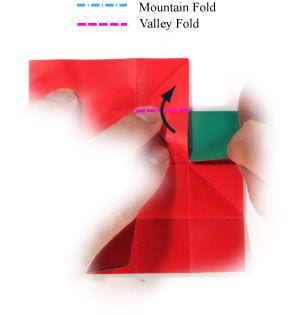
STEP 20.
Apply the horizontal "valley-fold" from step 19. The top "inside reverse-fold" from step 16 is now complete. Now finish the remaining three "inside reverse-folds" marked in step 16.
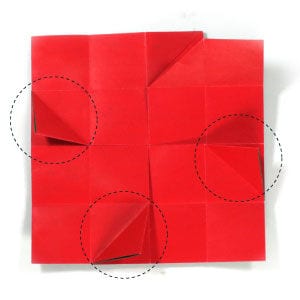
STEP 21.
Complete the four "inside reverse-folds" from step 16. Prepare to turn the model over.
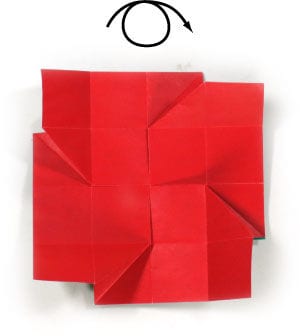
STEP 22.
Turn the model over. Prepare to apply a "valley-fold".
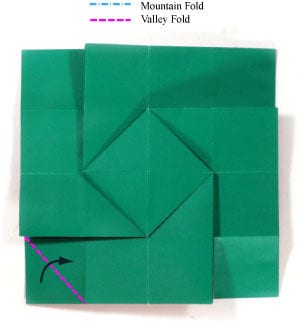
STEP 23.
Apply the "valley-fold" from step 22. Prepare to rotate the model 45 degrees.
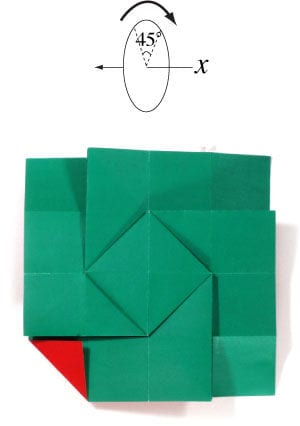
STEP 24.
Rotate the model 45 degrees. Prepare to apply a "valley-fold".
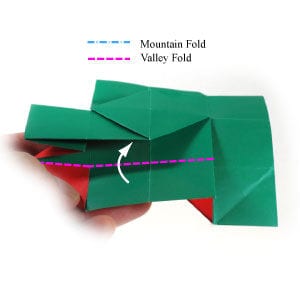
STEP 25.
Start applying the "valley-fold" from step 24.
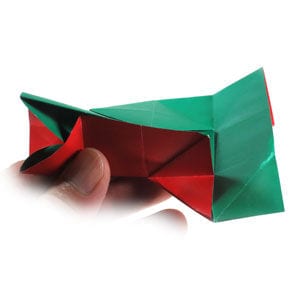
STEP 26.
Continue applying the "valley-fold" from step 24.
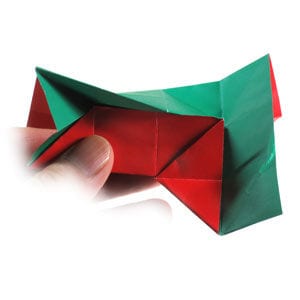
STEP 27.
Complete applying the "valley-fold" from step 24. Prepare to press the top to flatten the model.
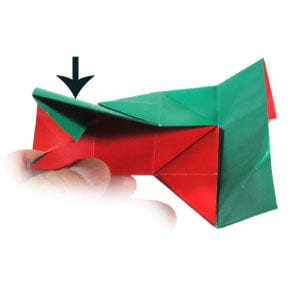
STEP 28.
Flatten the model. Prepare to rotate it 90 degrees.
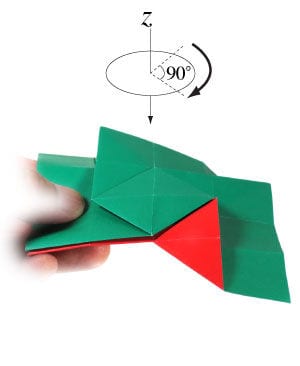
STEP 29.
Rotate the model 90 degrees. Prepare to apply a "valley-fold".
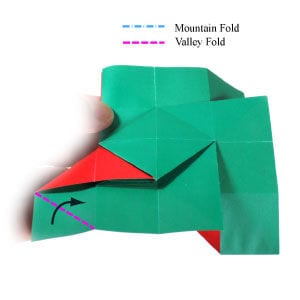
STEP 30.
Apply the "valley-fold" from step 29. Prepare to apply a horizontal "valley-fold".
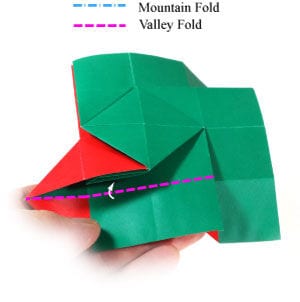
STEP 31.
Apply the horizontal "valley-fold" from step 30. Prepare to flatten the model.
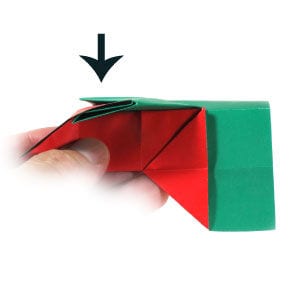
STEP 32.
Flatten the model. Prepare to rotate it 90 degrees.
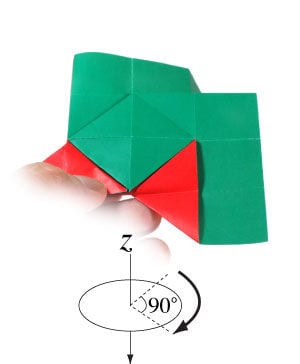
STEP 33.
Rotate the model 90 degrees. Prepare to apply a "valley-fold".
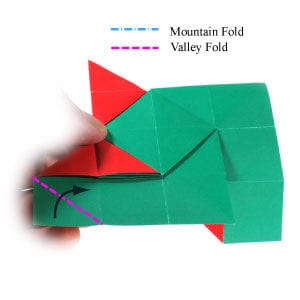
STEP 34.
Apply the "valley-fold" from step 33. Prepare to apply a horizontal "valley-fold".
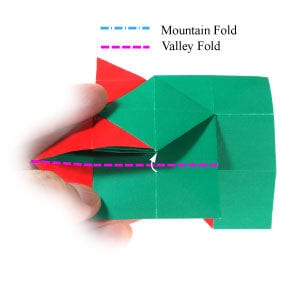
STEP 35.
Apply the horizontal "valley-fold" from step 34. Prepare to flatten the model.
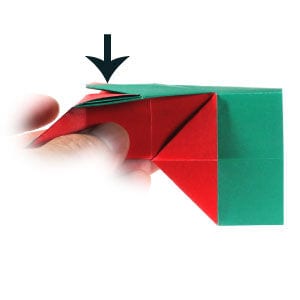
STEP 36.
Flatten the model. Prepare to rotate it 90 degrees.
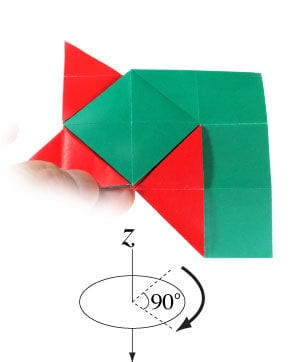
STEP 37.
Rotate the model 90 degrees. Prepare to apply a "valley-fold".
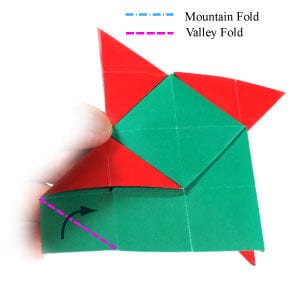
STEP 38.
Apply the "valley-fold" from step 37. Prepare to apply a horizontal "valley-fold".
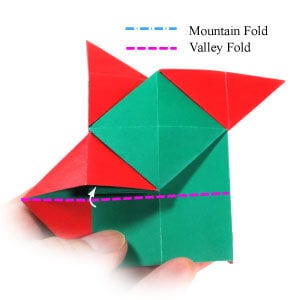
STEP 39.
Apply the horizontal "valley-fold" from step 38. Prepare to flatten the model.
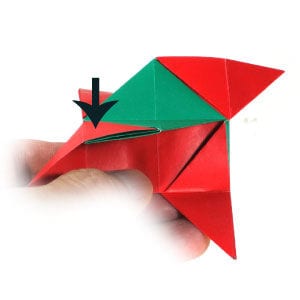
STEP 40.
Flatten the model. Prepare to lay the model down.
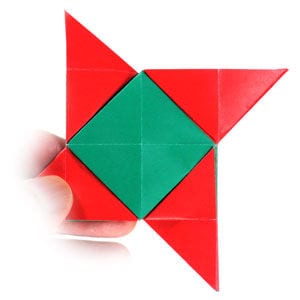
STEP 41.
Lay the model down. This is the back view of the origami ninja star. Prepare to turn the model over.
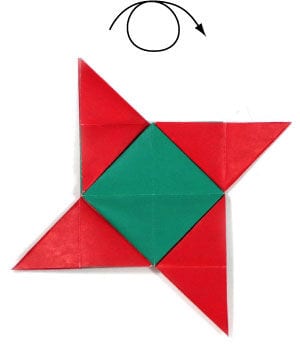
STEP 42.
Turn the model over. This is the back view of the origami ninja star.
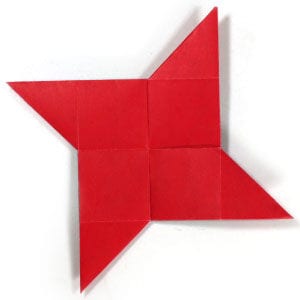
STEP 43.
Congratulations! You have now completed folding this new origami ninja star.





