
How to Fold a Flying Origami Crane (32-Step Photo Guide)
Everyone folds the classic crane, and then one day you want one that looks like it is actually moving — wings open, about to leave the table. That is what this model is for. It starts from the same bird base you already know, so the first steps feel familiar, and then it goes somewhere more interesting: two asymmetric squash folds open the wings, and a run of reverse folds gives you the long neck and tail. This is a genuinely useful model to learn if the inside and outside reverse folds still feel slippery, because you get to do both more than once. Use a 20 cm square with two different colours and be generous with your creases — a crane this detailed rewards precision. Take the cutting step slowly, and when you reach the last few folds along the wings, you will feel the paper come alive.
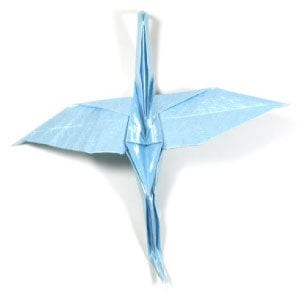
This tutorial shows how to fold a flying origami crane with wings spread wide.
The model is built on the bird base, and along the way you will practise both the inside reverse fold and the outside reverse fold. One unusual move you will meet here is the asymmetric squash fold.
You only need to be comfortable with valley folds and mountain folds to follow along.
Any kind of paper will do, though it is a little easier if the two sides differ slightly in colour or texture. Make sure the sheet is a true square, with four equal sides and four right angles. The paper used here is a 20 cm x 20 cm square, which is comfortable while you are learning — once the sequence feels familiar, try a smaller sheet.
This is the front side of the paper. White would look lovely, but it is very hard to see against a white background.

This is the back side of the paper. Bear in mind that the front side is the shinier of the two.

STEP 1
Start from the bird base. Prepare to make a horizontal valley fold.

STEP 2
Make the horizontal valley fold from step 1. Prepare to turn the model over.

STEP 3
Turn the model over. Prepare to make a horizontal valley fold.
STEP 4
Make the horizontal valley fold from step 3. Prepare to rotate the model by 180 degrees.

STEP 5
Rotate the model by 180 degrees. Prepare to make a vertical valley fold.

STEP 6
Make the vertical valley fold from step 5. Prepare to make three valley folds and one mountain fold.

STEP 7
Make the valley fold marked #1 in step 6, followed by the mountain fold marked #2, then make the two valley folds marked #3 and #4 at the same time. Prepare to make a vertical valley fold.

STEP 8
Make the vertical valley fold from step 7. Prepare to make three valley folds and one mountain fold.

STEP 9
Make the valley fold marked #1 in step 8, followed by the mountain fold marked #2, then make the two valley folds marked #3 and #4 at the same time. Prepare to make two valley folds.

STEP 10
Make the two valley folds from step 9 and check that your model matches the photo. Prepare to turn the crane over.

STEP 11
Turn the crane over. Prepare to make two asymmetric squash folds.

STEP 12
Make the two asymmetric squash folds from step 11. Prepare to make a horizontal valley fold.

STEP 13
Make the horizontal valley fold from step 12. Prepare to turn the crane over.

STEP 14
Turn the crane over. Prepare to valley-fold it in half vertically.

STEP 15
Make the vertical valley fold from step 14. Prepare to rotate the crane by 90 degrees.

STEP 16
Rotate the crane by 90 degrees. Prepare to make an inside reverse fold.

STEP 17
Make the inside reverse fold from step 16. Prepare to make another inside reverse fold.

STEP 18
Make the inside reverse fold from step 17. Prepare to make an outside reverse fold.

STEP 19
Make the outside reverse fold from step 18. Prepare to make a valley fold.

STEP 20
Make the valley fold from step 19. Prepare to turn the crane over.

STEP 21
Turn the crane over. Prepare to make a valley fold.

STEP 22
Make the valley fold from step 21. Prepare to rotate the crane by 90 degrees.

STEP 23
Rotate the crane by 90 degrees. Prepare to rotate it horizontally by another 90 degrees.

STEP 24
Rotate the crane horizontally by 90 degrees. Now focus on the two legs inside the dotted ellipse.

STEP 25
Concentrate on the two legs. Prepare to cut the paper along the dotted line with scissors or a craft knife.

STEP 26
Cut along the dotted line from step 25. Prepare to rotate the crane by 90 degrees.

STEP 27
Rotate the crane by 90 degrees. Prepare to move one leg aside so that both legs are visible.

STEP 28
Move one leg aside so you can see both legs. Prepare to make two inside reverse folds.

STEP 29
Make the two inside reverse folds from step 28. Prepare to rotate the crane by 90 degrees.

STEP 30
Rotate the crane by 90 degrees. You can stop here, or prepare to add a series of mountain folds to both wings.

STEP 31
Add a series of mountain folds to both wings.

STEP 32
Congratulations — your flying origami crane is complete.




